
Step 1: Open your image
To create the effect, you’ll need a photo of clouds. I’ll use this image that I downloaded from Adobe Stock:

The original image. Photo credit: Adobe Stock.
Step 2: Add your text
Add your text to the image. If we look in my Layers panel, we see that I’ve gone ahead and added some text, and the text is sitting on a Type layer above the Background layer. I’ll turn the text on by clicking the Type layer’s visibility icon:
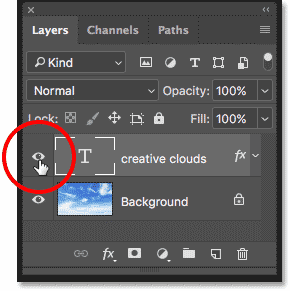
Turning on the Type layer in the Layers panel.
And now we see the words “creative clouds” (a little spin on Adobe’s “Creative Cloud”) in front of the image. I’ve added a slight gradient and an outer glow, just to make the text easier to see:

Adding the text.
Step 3: Open Photoshop’s Blending Options
At the moment, the text is sitting in front of the image. To blend the text into the image, we can use Photoshop’s Blending Options. To open the Blending Options, click the Layer Styles icon (the “fx” icon) at the bottom of the Layers panel:
Clicking the Layer Styles icon.
Then choose Blending Options from the top of the list:
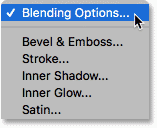
Opening the Blending Options.
Step 4: Use the “Blend If” sliders to blend the text into the background
This opens the Layer Style dialog box. At the bottom of the dialog box are two sliders. The one on top is labeled “This Layer”, and the one below it is labeled “Underlying Layer”. These are commonly-known as Photoshop’s “Blend If” sliders, and they let us blend our currently-selected layer with the layer(s) below it based on the luminosity, or brightness values, of the layers:
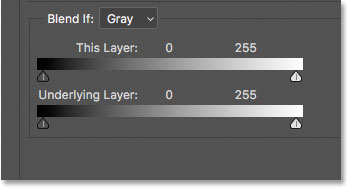
The “Blend If” sliders in the Layer Style dialog box.
First, make sure that the Blend If option above the sliders is set to Gray:
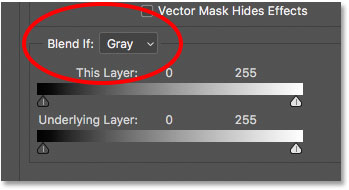
Blend If should be set to Gray.
To blend the text into the background, we only need the bottom slider (“Underlying Layer”). Click on the white triangle below the right side of the gradient bar and begin dragging it towards the left:
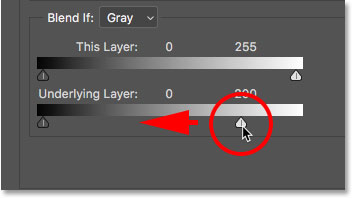
Dragging the white “Underlying Layer” slider to the left.
When you reach a certain point, you’ll see your text begin to disappear, revealing the clouds through the letters. Notice, though, that the transition between the text and the clouds is looking too harsh:

The initial effect looks pretty bad.
Step 5: Split the slider in half to create a smooth blend
To create a smooth transition between the text and the clouds, press and hold the Alt (Win) / Option (Mac) key on your keyboard, and then click and drag the left side of the triangle to split the slider into two halves. The area in between the two halves creates a gradual blend between the text and the clouds behind it. The further you spread the two halves apart, the smoother the transition appears:
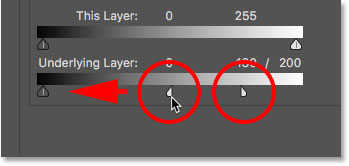
One slider becomes two.
After splitting the slider in half, things are looking much better. I’ll fine-tune the effect in a moment:

Splitting the slider created a more seamless blend between the clouds and the text.
Why we don’t need the black slider for this effect
So far, we’ve only used the white slider to blend the clouds in with the text. But there’s also a black slider below the left side of the “Underlying Layer” gradient bar. The white slider blends the lightest parts of the image in with the text, while the black slider blends in the darkest areas.
If we were blending a different type of background into the text, then we might also want to blend in the darker areas. We could do that by dragging the black slider towards the right. Holding Alt (Win) / Option (Mac) while dragging the black slider would split the slider in half to create a smooth transition, just as we’ve seen with the white slider. But in this case, all we would end up doing is blending the darker areas of the sky into the text, which wouldn’t look right. We only want to blend in the clouds. Since the clouds are the lightest parts of the image, the only slider we need for this effect is the white one.
Step 6: Adjust the two halves of the slider to fine-tune the effect
Finally, keep an eye on your image as you adjust the left and right half of the white slider until you’re happy with how the clouds are blending with the text:
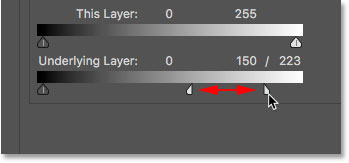
Fine-tuning the effect by adjusting each half of the slider.
Click OK to close the Layer Style dialog box, and you’re done! Here is my final “text in the clouds” effect:

The final result with the text now floating in the clouds.


+ There are no comments
Add yours